
We all want to protect the health of our environment. Which is why we were disheartened to learn from RE Sources that rain runoff from conventional roofs are destroying our urban streams and killing our salmon. But before you let that drive you to the point of ecoguilt, know that we have a solution for this problem! A rain garden for your gutter. Skip to the instructions.
What’s the problem with roof shingles?
In the United States, asphalt shingles make up about two-thirds of the roofing market for new construction and roof replacements. These shingle are made of fiberglass, asphalt cement, ceramic-coated natural rock, and mineral filler. Within these materials you’ll find the toxic culprits: zinc, arsenic, copper. These chemicals are getting into the marine environment and killing salmon, infiltrating our groundwater, and contaminating well systems. Not to mention, flooding, like the massive rain event we saw in Whatcom County in November 2021, exacerbates this problem.
FAQ
My downspout goes into a pipe that goes underground – does that go into the storm water system?
Yes. The pipe going underground will connect with a stormwater system and it will likely dump out into the closest water body. In Whatcom County, that could be your neighborhood creek, the Nooksack River, or the Bellingham Bay. New developments pipe the storm water to retention ponds where the water will be held while the solids settle out and can be removed before sending the water back to our watershed.
If the runoff wasn’t diverted and I lived on a well, could these toxins contaminate my drinking water?
Yes. The toxins could contaminate drinking water which is why we try to convey them away from our house and drinking water.
Are the toxins contaminating groundwater now?
Yes. These toxins contaminate our drinking water and flooding exacerbates the problem. That is why it is good to have plants taking in the storm water. Plants can actually utilize some of the metals and they can sequester some of the other toxins.
What specifically are zinc, copper, arsenic doing to our environment and salmon?
These chemicals effect different organisms in different ways. In salmon, particularly coho, copper effects their olfactory system, which makes it so the salmon don’t recognize predators and they can’t find their way back to spawning stream. Zinc kills salmon by destroying gill tissue, and arsenic seems to be more of a human health issue. The list of health effects is long; it starts with gastroenteritis but can lead to abnormalities in kidneys and liver. Read more on how Zinc affects public health and the effects of Copper.
What’s the solution?
It’s unrealistic to ask everyone to swap out their roofs. Plus, that just moves the problem away from our buildings and into the landfill. What we can do is filter rain water runoff through a mini rain garden. Using a combination of reclaimed materials, compost, and plants, we’ll create a simple option to prevent these toxins from entering our watershed.
See? We told you there was no need for ecoguilt.
How are we making an impact?
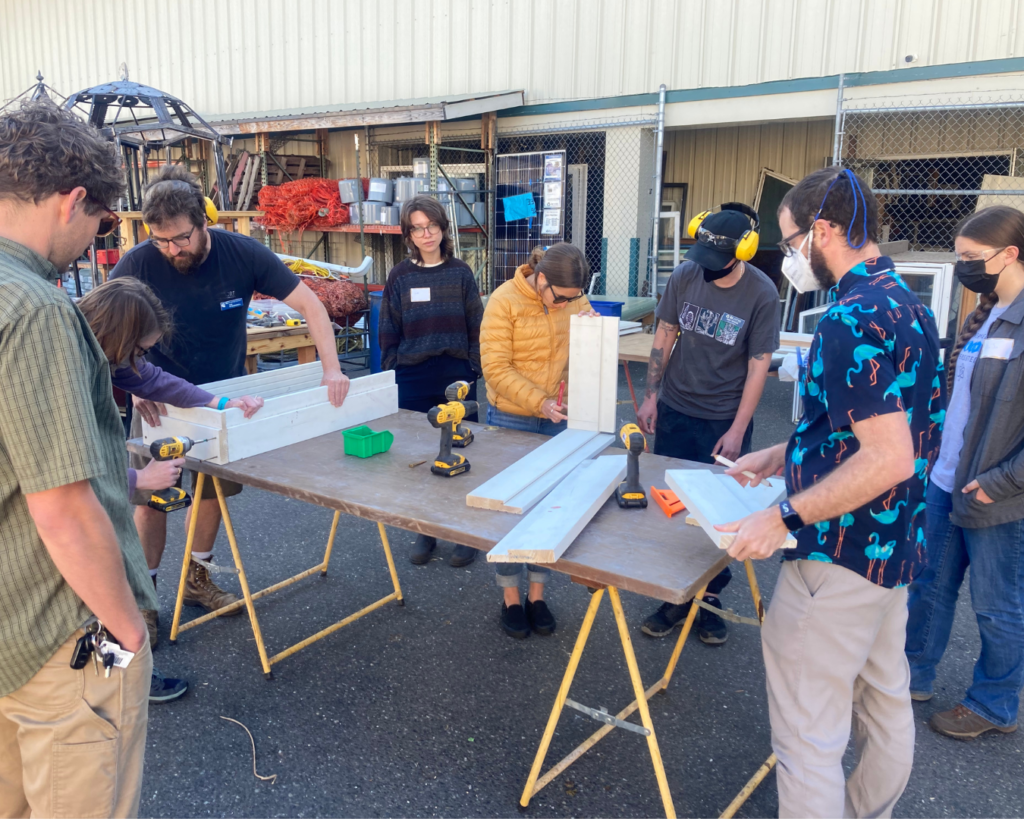
We partnered with Priscilla Brotherton from RE Sources’ Sustainable Schools program to teach a group of environmental leaders in education how to build these mini rain gardens. Our goal was to empower these leaders with the skills they need to teach their students, school facilities staff, and other faculty, how to build rain gardens. We have a lofty goal of ensuring every building in Whatcom County has a mini rain garden to filter rain water runoff, and we’re on our way.
Learn with us!
Find a downloadable PDF of the rain garden plans here, or continue reading for step-by-step instructions. If you’re an educator in Whatcom County and you’re interested in having a staff member from The RE Store come to your classroom to help students with projects similar to this, get in touch.


Materials
Shop at The RE Store first to find affordable, reclaimed materials for your project.
Makes a planter 36in long x 16in wide x 24in high
- 8, 2″x6″x15″ cuts of lumber; any type of dimensional lumber can be used for any of these cuts and the following cuts
- 8, 2″x6″x32″ cuts of lumber
- 3, 2″x4″x32″ cuts of lumber
- 2, 2″x2″x15″ cuts of lumber
- 4, 2″x2″x20.5″ cuts of lumber
- 2, decking boards mitered 2″x4″x36″
- 2, decking boards mitered 2″x4″x16″
- 80, 3″ single thread wood screws
- Plastic liner (72in x 96in – 6ml or comparable)
- PVC Pipe 2in – 3 pieces cut at 4in, 20in, and 28in (approx. 52inches total)
- 1 x PVC equal tee connector 2in
- Silicon sealant
- Waterproof tape
- Mesh screen (with rubber band or coupling)
- 4 bags soil / compost
- 2-3 bags sand
- 3-4 bags gravel (broken solar panel glass or oyster shells)
- Plants (see here for good options)
Equipment
Shop at The RE Store first to find affordable, lightly used tools for your project.
- Drill and driver set with bits
- Chop saw, circular saw, or hand saw
- Hack saw
- Staple gun
- Caulk gun
- Sand paper
- Tape measure
- Pencil
- Speed square
- Knife / scissors
- Safety glasses
- Ear protection
- Dust mask OPTIONAL – paint, stain
Directions
PUT ON YOUR PPE
Make sure you have on your ear protection and safety glasses before making any cuts.
CUT LUMBER
Using a chop saw, circular saw or handsaw, cut the lumber to make the short and long sides of the planter. Cut the bottom boards, stringers, corners and battens. Finally, cut the top decking lumber at a 450 miter on both ends of the boards. Sand any rough edges that might puncture the liner and paint or stain the wood as required to extend the life of your planter (optional).
ASSEMBLE SIDES IN LAYERS
Drill two evenly spaced holes ¾ in from the end of both sides of the “short side” boards. Butt two short sides against two long sides and attach them with screws creating a rectangular frame. Repeat this step until you have 4 equal sized frames.
ASSEMBLE BASE
Lay out the four bottom boards parallel to one another. Mark a perpendicular line on both sides of all four boards 6 inches from each side. Place the two bottom stringers on the lines so that they are perpendicular to the bottom boards. The stringer ends should hang over the edge of the bottom boards by about 1 ½ inches on either side. Attach stringers to bottom boards with two screws in each of the bottom boards per stringer.
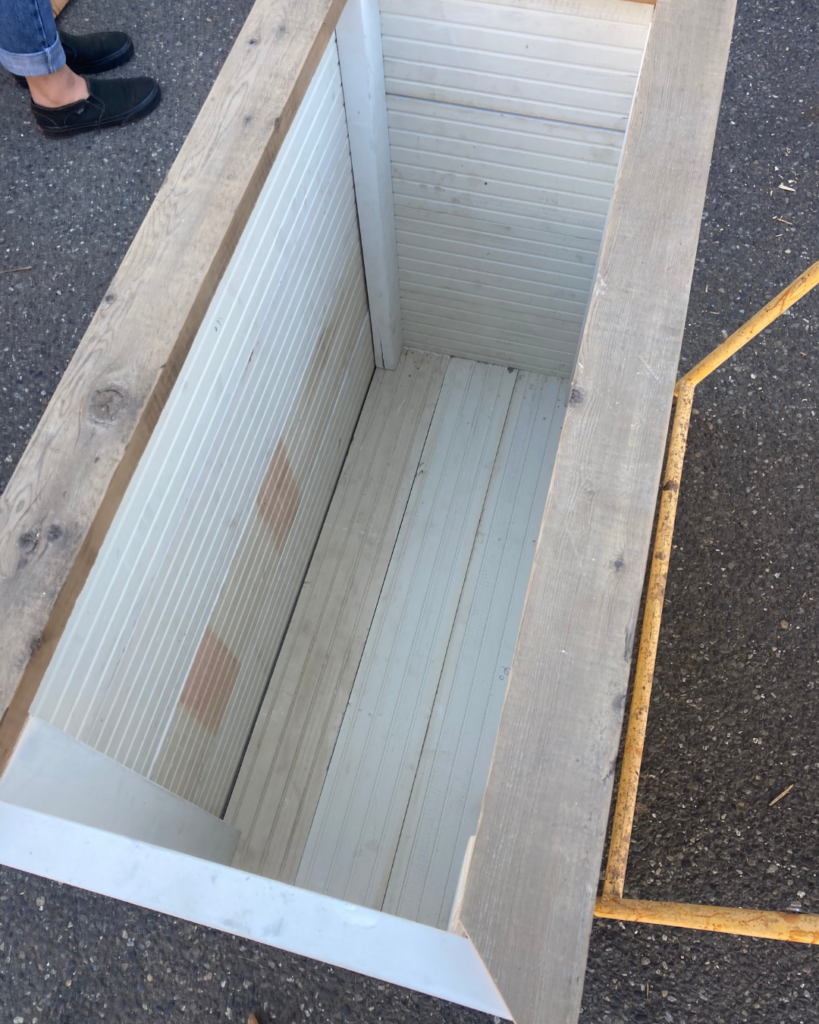
ASSEMBLE THE PLANTER BOX
Place the assembled base within one of the framed rectangular sides. Attach with screws through the stringer and from the sides. Flip over the assembly so that the base is on the ground. Now stack the remaining three framed sides on top of the base frame and place a corner board in each inside corner. Attach each corner board to each layer. Attach mitered top decking boards to the top of the planter box with screws.
LINE PLANTER
Line the planter with some robust plastic sheeting or PVC pond liner, allowing plenty of room for the liner to stretch. Fix with staples along the top edge. Make a small hole for the drainage pipe in the liner.
DRAINAGE PIPE ASSEMBLY
Cut three pieces of 2in PVC at 4in, 20in, and 28in using a hacksaw. Drill several holes in the 28in pipe (smaller than the gravel, glass or oyster shells). Assemble the three pieces of pipe into the “T” connector. Connect all pipes with silicon and tape. The 4in and 28in pieces should be in line with one another and the 20in piece will be perpendicular. Place a mesh screen with rubber band or coupling over the 20in and 28in pipe ends. Drill a 2 inch hole on a short side of the planter, centered from side to side and 1inch up from the base with a hole saw bit. Install pipe assembly through the inside of the planter, placing the 4in pipe portion through the liner and cut hole. Move the planter into its final location under downspout.
ADD FILTRATION MATERIALS
Add some gravel to the base and position the slotted pipe so that it drains down towards the outlet and ensure the drainage pipe is through the liner. Add the remaining gravel to cover the pipes and top with a permeable membrane to stop the rainwater from washing the soil out. Add a layer of sand then fill with a mix of soil/compost to sand in the ratio 4:1.
CONNECT UP PLANTER
Cut off or divert the downpipe from the roof to flow into the rain-box. You may need to add a downpipe shoe to direct the water. Place some large stones below the spout to prevent splashing and a debris filter on the overflow pipe. Plant with a variety of suitable perennial plants tolerant of dry conditions and able to withstand short period of immersion, including interest all year, and plants for pollinators.
Nice work!
You just built a mini rain garden to help filter out toxins for our watershed. We’d love to see what you’re completed project looks like. Send us photos or tag us on social media.