Necklaces, rings, bracelets and baubles. Many of us love jewelry or know someone that does. But our precious pretties run the risk of getting tangled or broken if they aren’t properly displayed. This simple and easily customizable jewelry organizer is sure to be a treasured gift – maybe better than a new necklace for Mother’s Day. Made with minimal tools and easy to find materials, this is a project even the most entry level DIY’er can accomplish.
Tools & Supplies
- Paint scraper
- Pliers
- Wire cutters
- Staple gun with staples
- Picture frame
- Wire or mesh
- Paint
- 2 D-rings
- Picture frame wire
- Felt pads
- Hooks or knobs
Instructions
- Visit your local thrift store and find a vintage wooden picture frame. Something smaller than 18”x 20” is ideal.
- Remove the artwork and glass and clean up the back to allow it to lie flush with a wall. You may need a paint scraper or pliers for this part.
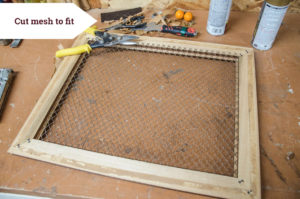
- Using wire cutters, cut your wire or mesh to be slightly smaller than the back of the frame.
- Set frame, mesh and hardware on cardboard and paint.
- When completely dry, attach mesh to back of picture frame with a staple gun.
- Attach d-rings to the top two corners of the back of the frame. String picture frame wire between them. Put felt pads in all four corners to help keep it off the wall.
- Attach hooks and knobs for holding chunkier jewelry, watches, and scarves on the front.
Tip: All of the supplies for this project can be completed with one visit to The RE Store. We have a large selection of wood picture frames, chicken wire, vintage radiator covering, gutter guard, and hardware cloth for wire mesh and cabinet drawer pulls, curtain rod hangers, eye hooks, and dowels as hanging hardware.
This article was originally published on BellinghamAlive.com.